Image Optimizing for Your WordPress Blog With Photoshop Elements

Today I’m going to talk about optimizing your images for your WordPress blog with Photoshop Elements. Now don’t get me wrong Photoshop CC is a powerhouse program–but that power comes with a price tag. In addition, there are many many options you might never need. I use Photoshop CC for my business, but for bloggers, I highly recommend Photoshop Elements.
This is a beginning of a series of tutorials and templates I will make available on this blog and my YouTube channel. Be sure to subscribe!
Editing your images before you upload is not optional with WordPress privately hosted (ex., my hosting) you need to do this before uploading your photos. Of course, you can install plugins to scale file size, however there’s a lot you can do before uploading that will make a huge difference.
And for those of you currently use Canva and PicMonkey, etc., they might be good marketing graphic creation solutions, they do not optimize images for the web–they are strictly to make high resolution, print quality graphics or graphics for platforms that compress images on upload (i.e., Typepad, Blogger, WordPress.com, Facebook, Instagram, etc.).
Beginner ‘how to’ video on using Photoshop Elements to optimize your photos
If you are reading this via email, click here to view the video on the web.
This video features how to edit your images, watermark them and optimize them for web viewing. You can get your copy of Photoshop Elements at this link and I will be publishing tutorials on how to do cool things with it in the future!
If you purchase your copy of Photoshop Elements through Amazon, scroll down for step-by-step how to access and license your copy of PE.
Click here to configure ‘Preference’ settings for better performance
Photoshop Element ‘Preferences’ for better performance
If you end up having issues with lagging changes while working with Photoshop Elements, there are a few things you can do. First, you can close all other programs (or restart your computer to turn off any unneeded background processes) and the video below shows the settings that I’ve used that have helped me:
Photography helps
Photoshop Elements – click here
Faux backdrops (wood, marble, etc.) – click here
Photo lightbox/tent for optimum shots – click here
Buying & Downloading Photoshop Elements on Amazon.com
Follow this link to purchase Photoshop Elements 2025 (you get both Mac and Windows version). If you choose downloadable, it will be in your ‘Software Download’ area on Amazon and in the future (new computer) you can download it again without looking for disks (plus you receive the software immediately).
Installing from Amazon (digital download version):
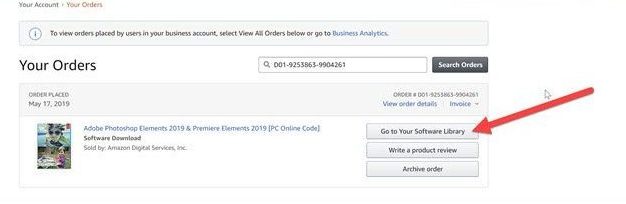
- Purchase the PC or Mac download version. After purchase, click on view ‘Your Orders’

2. Click on ‘Order Details’

3. Click on ‘View Order Details’

4. Click on Go To Software Library
5. Click on ‘How To Redeem’ link (after copying the “Redemption Code”). You will need the redemption code ONLY ONCE. You will use it inside the Adobe Account you will create to prove your purchase.

6. This is the pop up when you click on ‘How to Redeem’, follow the instructions to create an Adobe Account (or login to an existing). You will enter the redemption code (you only do this once) to get the Photoshop Elements Serial Number (important #)

7. Follow instructions– you will be downloading the Photoshop Elements and after launching it, you be prompted to purchase it or license it–at this point you will be choosing ‘license it’ and put in the Serial Number you have from Adobe. Save that Serial Number for future reference (or you can generate it again from inside your Adobe account (and Amazon) if you ever need to install it again.


Thanks Amy….excellent tutorial…will give it a shot!
This sounds easy enough. Can’t wait to try it!